Freelance Jobs
Showing posts with label Graphic design. Show all posts

Sunday, January 15, 2012

How to make a nice background for products in a brochure in Photoshop ?


If you think that those articles are useful please support me by clicking on the sidebars.


Firstable we have to choose a material that it's close to the theme of our brochure. I was actually doing a themed brochure about some products from Africa. So i choose picture of banana leaf with very contrast color and the image is really punching. My whole brochure was in different style of colors so it would look different if i just paste the image to my brochure.


So i add a new layer and paint with the bucket with colors: C: 56 M: 28 Y:100 K:8


Make the layer with 70% opacity and add an effect on it in layer style: Satin > blend mode: Multiply, pink color, Opacity: 25%.
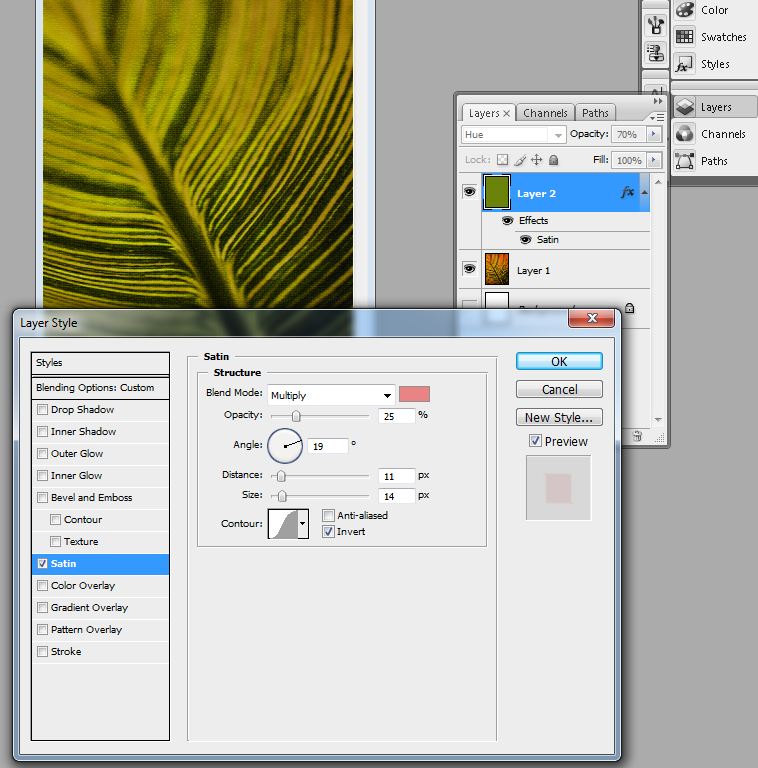


After we add one more effect on it to become more realistic pad to look like it's handmade. We go to Filter> Artistic > Texturizer: Scaling:100 Size: 4


So in the as a result you need to achieve this:

Sunday, April 11, 2010

How to make lomo effect on the image ?


If you think that those articles are useful please support me by clicking on the sidebars.


In this lesson you will learn how we can achieve a Lomo effect on a picture:


Open the photo. The first thing you should do is to take the freehand lasso tool and make a circle around the picture. It's not necessary to be perfect, remember to prevent hard edges, I put pen to 80-90px.


Once you've put pen (shown above) and draw a circle, you must invert the selection. You can do this in two ways. Ctrl + Shift + I or go to menu Select > Inverse.


Now to achieve the vignette, I add Levels layer.
Note: I still have invert selected.
Setting must be the following:


This will add masked layer on top of your original layer. Then i put up levels by moving the center arrow to the right. This will darken the edges, giving me VIGNETTE. The amount is up to you and in this case I went from 1. 00 to 0. 50 central figure highlighted in the image below.

Sunday, April 4, 2010

How to make an image look old ?


If you think that those articles are useful please support me by clicking on the sidebars.


Now we will make photos look very old:
 

1. Open your desired image:
 photoshop tutorial
and most importantly, open your file texture you will use. I choose wrinkled brown paper:

2. Duplicate the main image and open the settings window Level menu Image -> Adjustment -> Level. I used the following values​​:  52, 1, 44, 255.

3. Now apply a sepia effect, go to Color Balance (Ctrl + B). I set these values ​​to achieve a sepia effect: 64, -4, -73.

4. Again, go to Level window of Image -> Adjustment -> Level. This time, put the following values​​: 34, 0.89, 255.

5. Copy the image of the paper and put a layer over your photo. Change the blending mode to Overlay.

6. Use the tools Dodge Tool and Burn Tool, to make your picture look really very old.

7. Go to menu Filter -> Noise -> Add noise and add a little noise of photography.

Here are the results:
photoshop tutorial

Източник на урока: www.dphotojournal.com